
cert-manager allows you to enable HTTPS on your Coder installation, regardless of whether you're using Let's Encrypt or you have your own certificate authority.
This guide will show you how to install cert-manager v1.0.1 and set up your cluster to issue Let's Encrypt certificates for your Coder installation so that you can enable HTTPS on your Coder deployment.
We recommend reviewing the official cert-manager documentation if you encounter any issues or if you want info on using a different certificate issuer.
Prerequisites
You must have:
- A Kubernetes cluster (v1.15 or greater) with internet connectivity
- kubectl with patch version greater than v1.18.8, v1.17.11, or v1.16.14
Step 1: Add cert-manager to your Kubernetes cluster
# Kubernetes 1.16+
$ kubectl apply --validate=false -f \
https://github.com/jetstack/cert-manager/releases/download/v1.0.1/cert-manager.yaml

# Kubernetes <1.16
$ kubectl apply --validate=false -f \
https://github.com/jetstack/cert-manager/releases/download/v1.0.1/cert-manager-legacy.yaml
--validate=falseis required to bypass kubectl's resource validation on the client-side that exists in older versions of Kubernetes.
Once you've started the installation process, you can verify that all the pods are running:
$ kubectl get pods -n cert-manager

NAME                                       READY   STATUS    RESTARTS   AGE
cert-manager-7cd5cdf774-vb2pr              1/1     Running   0          84s
cert-manager-cainjector-6546bf7765-ssxhf   1/1     Running   0          84s
cert-manager-webhook-7f68b65458-zvzn9      1/1     Running   0          84s
Step 2: Create an ACME issuer
cert-manager supports HTTP01 and DNS01 challenges, as well as many DNS providers. This guide, however, shows you how to use Cloudflare for DNS01 challenges. This is necessary to issue wildcard certificates, which are required for Coder's dev URLs feature.
First, get the Cloudflare API credentials for cert-manager to use; cert-manager needs permission to add a temporary TXT record and delete it after the challenge has been completed.
Open the Cloudflare dashboard and go to My Profile > API Tokens. Click Create Token, then go to Create Custom Token and click Get Started.
Create a token with the following settings:
-
Permissions:
- Zone: DNS = Edit
-
Zone Resources:
- Include: Specific Zone = your-domain.com
You can also add more zones (or give the token access to all zones in your account), and set an expiry date.

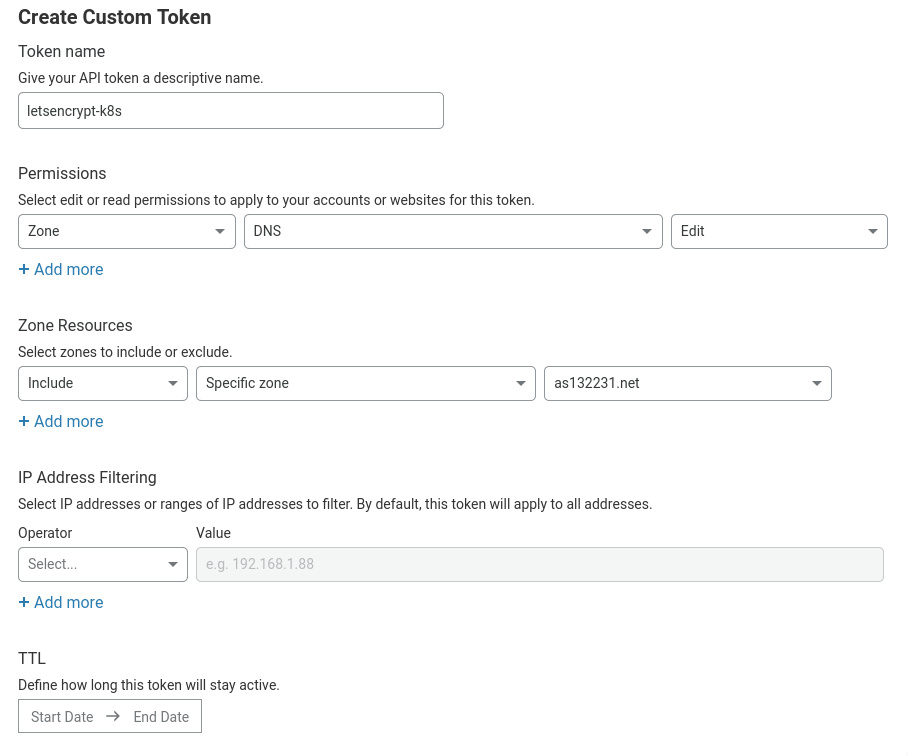
Click Continue to summary, then Create Token. Be sure to copy and save the token displayed because Cloudflare will not display it again.
Now that we have our Cloudflare API token, we need to configure cert-manager to use it. In a text editor, create a new file called issuer.yaml and paste the following:
apiVersion: v1
kind: Secret
metadata:
  name: cloudflare-api-token-secret
  namespace: coder # Your Coder deployment namespace
type: Opaque
stringData:
  api-token: "" # Your Cloudflare API token (from earlier)

---
apiVersion: cert-manager.io/v1alpha2
kind: Issuer
metadata:
  name: letsencrypt
  namespace: coder # Your Coder deployment namespace
spec:
  acme:
    email: "" # Your email address (given to Let's Encrypt)
    server: "https://acme-v02.api.letsencrypt.org/directory"
    privateKeySecretRef:
      name: letsencrypt-account-key
    solvers:
      - dns01:
          cloudflare:
            email: "" # Your Cloudflare email address
            apiTokenSecretRef:
              name: cloudflare-api-token-secret
              key: api-token

        # This section denotes which domains to use this issuer for. If you didn't
        # limit which zones the API token had access to, you may wish to remove
        # this section.
        selector:
          dnsZones:
            # Only use this issuer for the domain example.com and its subdomains.
            - "example.com"
ClusterIssuers
cert-manager has a concept of Issuer (which are per-namespace) or ClusterIssuer (which are global to the entire cluster). If you plan on using cert-manager only for Coder, you may choose to use the Issuer configuration above. If you want to use a ClusterIssuer instead, you'll need to make the following changes:
- Change the namespace of the secret to cert-manager
- Change the kind of the Issuer to ClusterIssuer
- Remove the namespace of the ClusterIssuer
- Change the additional annotations to
cert-manager.io/cluster-issuer: letsencrypt
For further information, see Setting Up Issuers.
Read the comments and fill out the blanks. Once you're done, you can go ahead and apply that to your cluster using:
$ kubectl apply -f issuer.yaml

secret/cloudflare-api-key-secret created
issuer.cert-manager.io/letsencrypt created
Step 3: Configure Coder to issue and use the certificates
If your installation uses an external egress, you'll need to configure your ingress to use the coder-root-cert and coder-devurls-cert.
However, if you're using the default ingress included in the helm chart, you can use the following helm values to configure the internal ingress and automatically create your certificate:
ingress:
  useDefault: true
  host: "coder.example.com"
  tls:
    enable: true
    hostSecretName: coder-root-cert
    devurlsHostSecretName: coder-devurls-cert
  additionalAnnotations:
    - "cert-manager.io/issuer: letsencrypt"

devurls:
  host: "*.coder.example.com"
Be sure to redeploy Coder after changing your Helm values. If, after redeploying, you're not getting a valid certificate, see cert-manager's troubleshooting guide for additional assistance.