This article walks you through setting up single sign-on to Coder using Azure's Active Directory Federation Services (ADFS).
Configuring Coder's OpenID Connect feature requires you to provide three pieces of information from Azure:
- Client ID
- Client Secret
- Issuer
This guide will show you how to set up Azure's Active Directory Federation Services and obtain the information you need to provide to Coder.
Step 1: Create a new application group for Coder
-
On the server running ADFS, open Server Manager and go to Tools > AD FS Management.

-
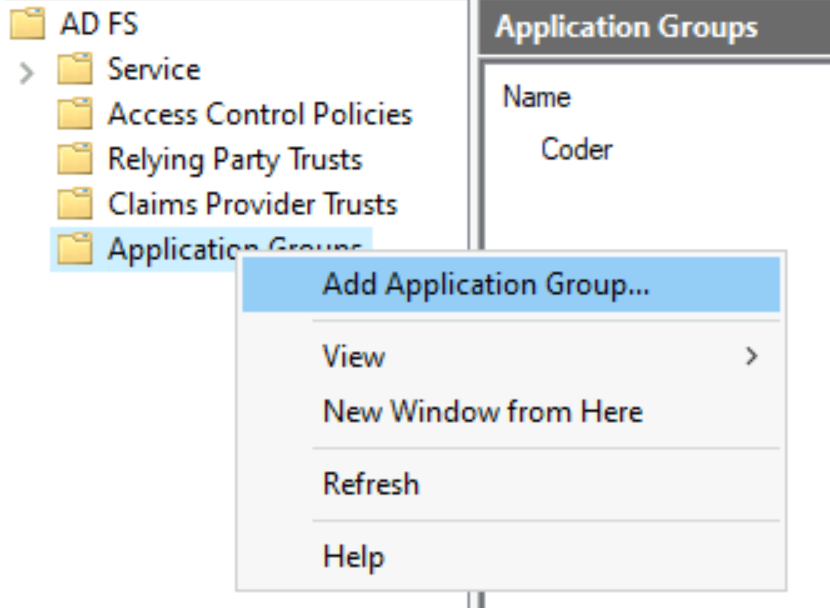
In the left-hand pane, right-click on Application Groups and select Add Application Group....
-
In the prompt window that appears, enter a Name and a Description (optional). Under Template, select Server application accessing a web API. Click Next to proceed.

-
In the next prompt window, you'll see a Client identifier. Save this value, since you'll need to provide it at a later step. Next, provide a Redirect URI (this value should be
https://coder.your-domain.com/oidc/callback) and click Add. Then, click Next to proceed.
-
In the next screen, titled Configure Application Credentials, click the Generate a shared secret checkbox. Note the Secret value that appears, since you'll need to provide this to Coder at a later step. Click Next to proceed.

-
In the next step, Configure Web API, enter the Client identifier that you saved in step 4 in the field called Identified and click Add. Click Next to proceed.

-
On the Choose Access Control Policy screen, choose your preferred access control policy, and click Next to proceed.
In the example below, we permit members of a specific group
coder-usersto access Coder.
-
For the step Configure Application Permissions, select the following Permitted scopes:
allataclaimsemailopenidprofile
Click Next to proceed.

-
Finally, in the Summary window, review the information you've provided. Click Next when you're ready to proceed and close the setup wizard.
Step 2: Modify the claim rules
In this step, you'll ensure that the access tokens sent by ADFS include the
following
OIDC standard claims:
name and email.
-
In Server Manager, double-click on your newly created application group.
-
Under Applications, select the Web API application and click Edit.

-
Select the tab Issuance Transform Rules and click Add Rule.... This will open the Add Transform Claim Rule Wizard.

-
In the rule wizard, under Claim rule template, select the option to Send Claims using a Custom Rule, and click Next.
-
Enter a name for the claim rule.
-
In the Custom Rule field, enter a claim rule written in the ADFS Claim Rule Language.
The following example claim rule maps the Active Directory attributes
userPrincipalNameanddisplayNameasemailandname, respectively:c:[Type == "http://schemas.microsoft.com/ws/2008/06/identity/claims/windowsaccountname", Issuer == "AD AUTHORITY"] => issue(store = "Active Directory", types = ("email", "name"), query = ";userPrincipalName,displayName;{0}", param = c.Value);For more information, see Create a Rule to Send Claims Using a Custom Rule
Step 3: Gather information for Coder authentication
Once you've created your application group, you'll have the Client ID and
Client Secret. However, you still need the issuer, which you can get by
running the Get-ADFSProperties Powershell cmdlet on the server running ADFS:
Get-ADFSProperties | Select IdTokenIssuer
You should see something similar for the output:
PS C:\Users\coder> Get-ADFSProperties | Select IdTokenIssuer

IdTokenIssuer
- - - - - - -
https://dc1.ba3...da221.westeurope.aksapp.io/adfs
Step 4: Configure Coder authentication
At this point, you can continue with configuring authentication in Coder.
-
Log into Coder and go to Manage > Admin > Authentication.
-
In the top-most drop-down box, select OpenID Connect.
-
Provide the requested values for Client ID, Client Secret, and Issuer.
When done, click Save Preferences. At this point, Coder validates your configuration before proceeding. If successful, you can expect Coder to send OIDC login attempts to your configured ADFS instance.