There are several primary ways you can connect an IDE to your Coder workspace:
- VS Code remote SSH with local VS Code
- VS Code in the browser with code-server
- JetBrains Gateway and SSH
- JetBrains in the browser with JetBrains Projector
- JetBrains' Code With Me
- Multiple JetBrains IDEs
- Jupyter Notebook
- JupyterLab
- RStudio
- Any local editor with 1-way file synchronization or 2-way file synchronization over SSH
VS Code remote SSH
Once you've set up SSH access to Coder, you can work on projects from your local VS Code, connected to your Coder workspace for compute, etc.
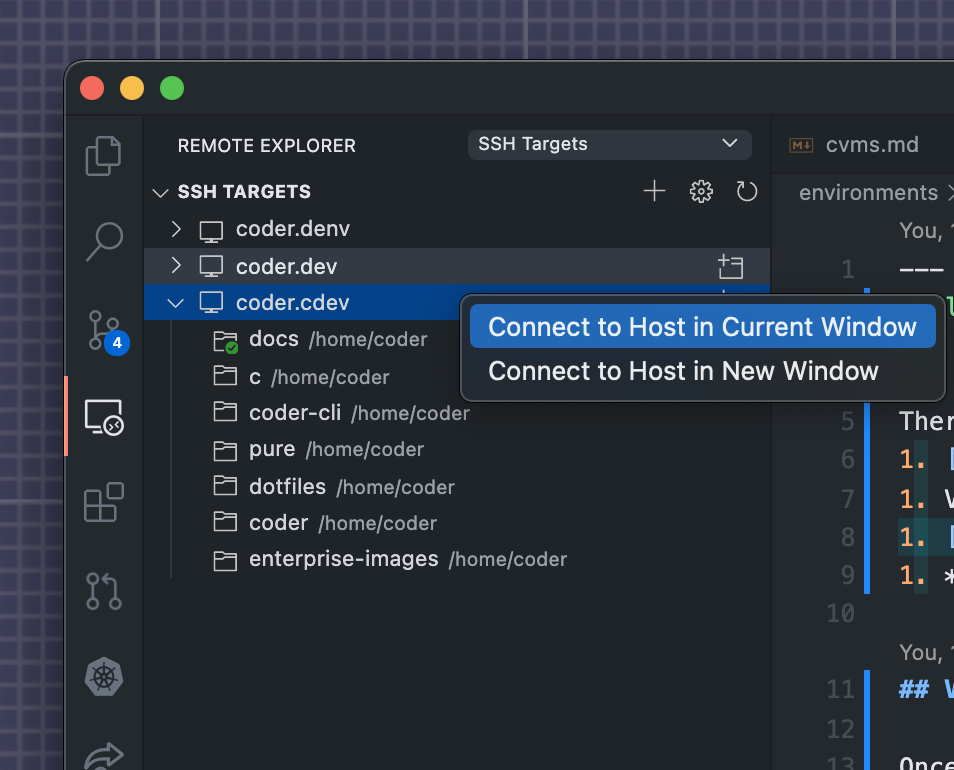
- Open VS Code locally.
- Make sure that you've installed Remote - SSH extension
- In VS Code's left-hand nav bar, click Remote Explorer and right-click on a workspace to connect
VS Code in the browser
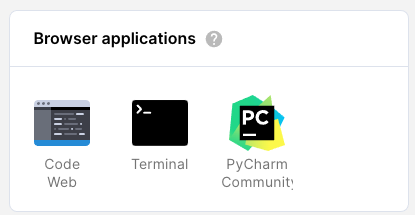
Launch VS Code in the browser from the workspaces page by clicking the Code Web icon.
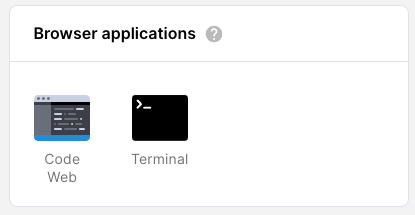
Code Web is Coder's open-source project code-server.
Opening files via the terminal
You can open files from your Coder workspace in VS Code via the terminal. We
recommend creating an alias to the underlying code-server executable so that you
can use the command code for this process:
alias code="/var/tmp/coder/code-server/bin/code-server -r"
Then, to open a file (e.g., personalize.log):
code personalize.log
Alternatively, if you would like to use just the code-server executable, add it
to your PATH:
export PATH=$PATH:/var/tmp/coder/code-server/bin
Then, to open a file (e.g., personalize.log):
code-server -r personalize.log
If you're using Coder's web terminal, make sure that you've opened a Code Web session. If, however, you're using the web IDE's terminal, the file contents will appear in the IDE.
JetBrains Gateway with SSH
If your image includes a JetBrains IDE and you've set up SSH access to Coder, you can use JetBrains Gateway to run a local JetBrains IDE connected to your Coder workspace.
Please note that:
- Your Coder workspace must be running. Gateway needs compute resources, so monitor your resource usage on the Coder dashboard and adjust accordingly.
- If you use a premium JetBrains IDE (e.g., GoLand, IntelliJ IDEA Ultimate), you will still need a license to use it remotely with Coder.
-
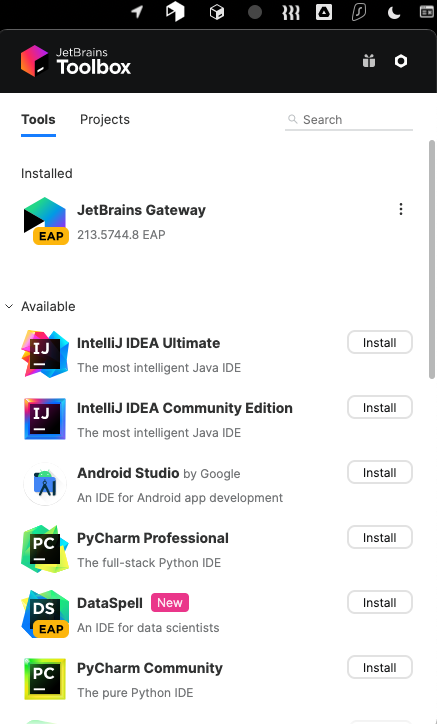
Download and install JetBrains Toolbox. Locate JetBrains Gateway in the Toolbox list and click Install.
-
Open JetBrains Gateway and click Connect via SSH within the Run the IDE Remotely section.

-
Click the small gear icon to the right of the Connection field, then the + button on the next screen to create a new configuration.

-
Enter your Coder workspace alias target in Host (e.g.,
coder.mark-python),22in Port,coderin User name, and change Authentication Type to OpenSSH config and authentication agent. Leave the local port field blank. Click Test Connection.
-
With your created configuration in the Connection chosen in the drop-down field, click Test Connection, then OK.

-
Select a JetBrains IDE from the IDE version drop-down. Choose the IDE installed in your Coder workspace, and click the folder icon and select your
/home/coderdirectory in your Coder workspace.
-
During this installation step, Gateway downloads the IDE and a JetBrains client. This may take a couple minutes.


If your Coder deployment is configured with ECDSA ssh key algorithm, change the Gateway authentication type to Key pair and create the Coder public ssh key in your local
~/.sshdirectory withssh-keygen -y -f:
~/.ssh/coder_enterprise | tee ~/.ssh/coder_enterprise.pub
JetBrains IDEs in the browser
Coder uses an open-source project called Projector, created and managed by JetBrains, to render a JetBrains IDE in a browser.
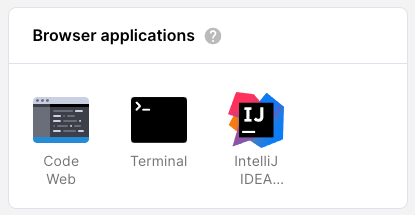
If your image includes a JetBrains IDE (such as IntelliJ, PyCharm, and PhpStorm), you can launch it from the dashboard.
Coder launches JetBrains IDEs in their own windows; be sure to set your browser to allow popup windows so that you can use your IDE.
Follow these steps to start a trial or activate your paid JetBrains license.
Installing JetBrains' IDEs
You install JetBrains IDEs in a Dockerfile, add the required packages to run JetBrains in a browser, and create a symlink with one of the following names so Coder can auto-detect the IDE and display the icon in the workspace.
Using Docker, you docker build the image from the Dockerfile. You then push
the image to your container registry and import the image into your Coder
deployment.
Your administrator can follow these steps to build the JetBrains IDE image.
The symlink names supported by Coder are:
cliondatagripdataspellgolandintellij-idea-ultimateintellij-idea-communityphpstormpycharmpycharm-communityriderrubyminestudio(Android Studio)webstorm
System requirements
The resources required depends on your workspace-specific requirements. We recommend reviewing the documentation for your IDE to obtain a starting point.
Known issues
- Window dragging behavior can misalign with mouse movements
- Popover dialogs do not always appear in the correct location
- Popup windows are missing titles and window controls
- Some theme-based plugins can cause the IDE to render incorrectly
- Some minor rendering artifacts occur during regular usage
- Keyboard shortcuts being overridden by the browser. Try running JetBrains as a Progressive Web App to regain shortcuts.
Code With Me
JetBrains' Code With Me allows you to collaborate with others in real-time on your project and enables pair programming.
You must have a JetBrains IDE installed in your image to start a Code With Me session from your Coder workspace. Only the workspace where the source code is being worked on needs JetBrains; other collaborators do not need a JetBrains IDE.
Getting started
To set up a Code With Me session:
- The host creates a session and shares the information needed to join the session with other participants.
- The participants use the information provided by the host to join the session and request access.
- The host accepts the participants' request to join the session created by the host.
Step 1: Start and host a session
To create and host a Code With Me session:
-
Log in to Coder.
-
Under Browser Applications, launch the JetBrains IDE (e.g., IntelliJ PyCharm) of your choice.
-
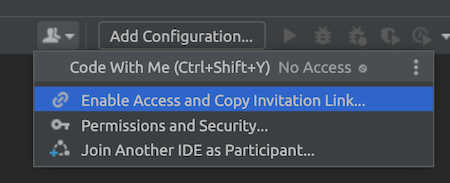
Click the Code With Me icon at the top of your IDE.

-
Select Enable Access and Copy Invitation Link....
-
Confirm and accept the Terms of Use.
-
Set the permissions for new guests to Full access and uncheck the Automatically start voice call feature. Click Enable Access.
-
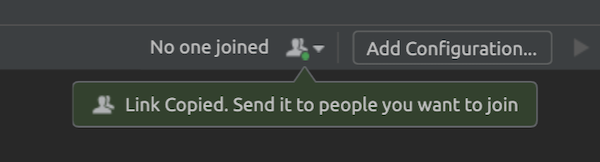
Once you've enabled access, JetBrains copies the link you must share with participants to your clipboard. Send this link to those with whom you'd like to collaborate.
You can recopy this link at any time by clicking the Code With Me icon and choosing Copy Invitation Link....
Step 2: Request to join the session
If you've received a link to join a Code With Me session as a participant:
-
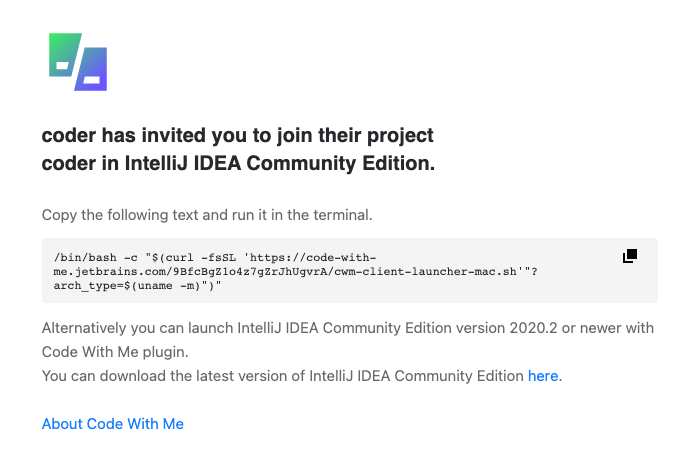
Copy the Code With Me session link that you were provided, and paste it into your web browser. You'll be directed to a webpage with further instructions.
-
On the instructions page to which you were directed, copy the code snippet and run it in the terminal.
-
Confirm and accept the User Agreement.
-
You'll be shown a security code. Verify with the host of your session that they see the same code.
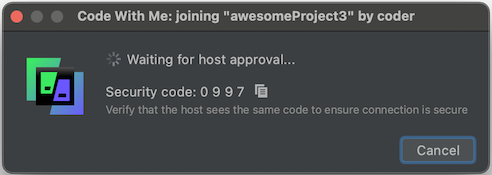
-
Wait for your host to accept your request to join; when they do, your JetBrains IDE will launch automatically.
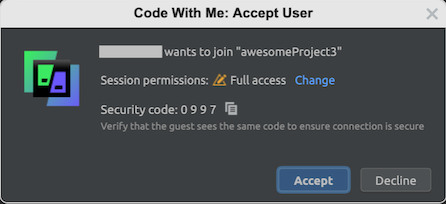
Step 3: Accept the request to the join
If you're the host of the session, you'll see a request that the other participant wants to join your project, the permissions you've granted to the other user, and a security code.
Verify that the security code you see matches the one shown to your participants. If they do, click Accept to proceed.
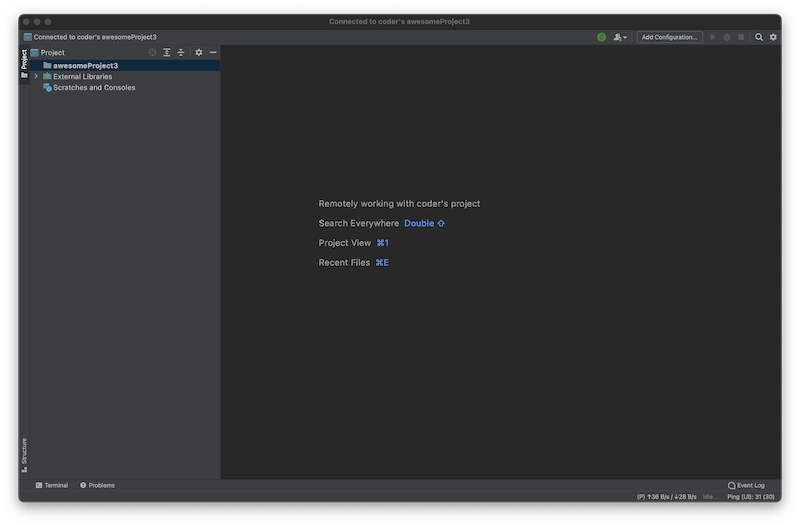
At this point, you'll be able to share your project and work with your partner in real-time.
Multiple JetBrains IDEs
If you'd like to have multiple projects open, you'll need to have multiple JetBrains IDEs open in Coder simultaneously. The following steps show you how to configure Coder to enable this behavior.
Running multiple instances of the same JetBrains IDE requires you to create a custom image and configure script to install the JetBrains Projector CLI using a custom image and configure script.
The configure script will install JetBrains Projector, then use the Projector CLI to install as many additional IDE instances as you need. Coder's workspace applications feature surfaces the additional IDE icons in the workspace.
We have provided detailed configuration steps for setting up your custom image and configure script.
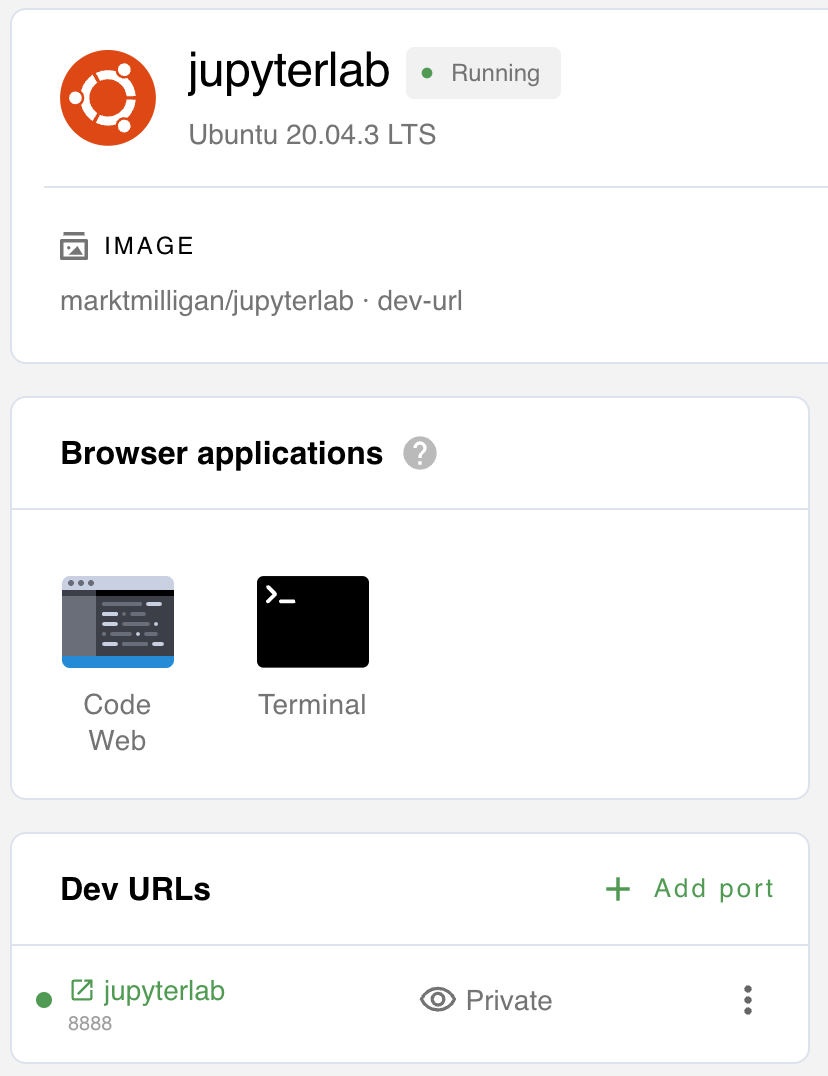
Jupyter Notebook
Jupyter Notebook is the original web IDE for creating Notebooks used in data
science, machine learning and analytics projects. By default, any Coder
workspace with the Jupyter project installed (in /usr/local/bin/jupyter)
will render the icon to launch Jupyter Notebook.
To use Jupyter Notebook in a Coder workspace, build a Dockerfile with Jupyter project installed as shown below:
# Dockerfile to install Jupyter Notebook
FROM codercom/enterprise-base:ubuntu

USER root

RUN pip3 install jupyter notebook

USER coder
JupyterLab
JupyterLab is the next-generation web-based IDE for data science and Python using documents called Notebooks.

There are three methods to install and access JupyterLab in Coder. All require
JupyterLab to be installed in the Dockerfile via pip3 install jupyterlab.
The first method renames the jupyter binary and copies a new jupyter that
adjusts the arguments passed to the jupyter binary to tell Coder to launch
JupyterLab instead of Notebook.
FROM codercom/enterprise-base:ubuntu

USER root

RUN pip3 install jupyterlab
RUN pip3 install jupyter notebook

RUN mv /usr/local/bin/jupyter /usr/local/bin/jupyter.py

COPY jupyter /usr/local/bin/jupyter

USER coder
Below is an example jupyter script with the lab arguments. This file must
be located in the same directory as the Dockerfile to be copied during docker build
#!/bin/bash
# Replace all "NotebookApp" settings with ServerApp settings.
args=${@//LabApp/"ServerApp"}
# Replace 'notebook' with 'lab' to launch juypter lab
args=${args/notebook/"lab"}

jupyter.py ${args}
The second method to run JupyterLab is with a dev URL and launching
JupyterLab via supervisord in the configure script. The benefit of this
approach is it is completely independent of Coder's IDE launching mechanism
and relies only on a generic dev URL.
FROM codercom/enterprise-base:ubuntu

USER root

RUN pip3 install jupyterlab
RUN pip3 install jupyter notebook

# configure script to create a dev URL and launch JupyterLab
COPY ["configure", "/coder/configure"]
RUN chmod +x /coder/configure

# install supervisord
RUN apt-get update && apt-get install -y supervisor
RUN mkdir -p /var/log/supervisor
COPY supervisord.conf /etc/supervisor/conf.d/supervisord.conf

# change back to the coder user
USER coder
The configure script installs supervisord
#!/bin/bash

echo 'create dev URL for JupyterLab'
coder urls create $CODER_WORKSPACE_NAME 8888 --name jupyterlab

echo 'start supervisord and JupyterLab'
sudo /usr/bin/supervisord
The supervisord.conf launches JupyterLab. This file must be located in the
same directory as the Dockerfile to be copied during docker build
[supervisord]
nodaemon=false
environment=HOME=/home/coder

[program:jupyterlab]
command=/usr/local/bin/jupyter lab --ip='*' --NotebookApp.token='' --NotebookApp.password=''
user=coder
directory=/home/coder
The third method to access JupyterLab is locally using the SSH port forward
command: ssh -L 8888:localhost:8888 coder.jupyterlab. Alternatively, you can
use the Coder CLI to port forward using: coder tunnel jupyterlab 8888 8888.
Now, open a local browser and navigate to https://localhost:8888.
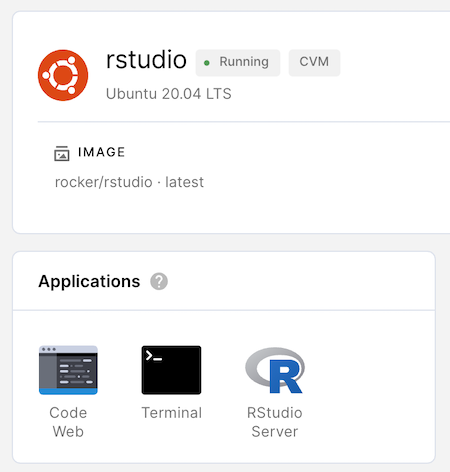
RStudio
Coder supports RStudio. To create a workspace that lets you use RStudio:
-
Create a custom image with RStudio installed,
rserverinPATH.To do this, you can refer to the sample Dockerfile below, which installs RStudio Server Open Source to log in with username
coderand passwordrstudio.This Dockerfile approach works now with latest versions of RStudio including 2022-2-1.
FROM codercom/enterprise-base:ubuntu USER root # Install dependencies RUN apt-get update && \ DEBIAN_FRONTEND="noninteractive" apt-get install --yes \ r-base \ gdebi-core # Install RStudio RUN wget https://download2.rstudio.org/server/bionic/amd64/rstudio-server-2022.02.1-461-amd64.deb && \ gdebi --non-interactive rstudio-server-2022.02.1-461-amd64.deb # Ensure rstudio files can be written to by the coder user. RUN chown -R coder:coder /var/lib/rstudio-server RUN echo "server-pid-file=/tmp/rstudio-server.pid" >> /etc/rstudio/rserver.conf RUN echo "server-data-dir=/tmp/rstudio" >> /etc/rstudio/rserver.conf RUN echo "www-frame-origin=same" >> /etc/rstudio/rserver.conf RUN echo "server-user=coder" >> /etc/rstudio/rserver.conf # Remove the following line if you do not run Coder on https RUN echo "server-add-header=X-Forwarded-Proto: https" >> /etc/rstudio/rserver.conf # Assign password "rstudio" to coder user. RUN echo 'coder:rstudio' | chpasswd # Assign locale RUN locale-gen en_US.UTF-8 # Run as coder user USER coder # Add RStudio to path ENV PATH /usr/lib/rstudio-server/bin:${PATH} -
Create a workspace using the image you created in the previous step.
-
At this point, you can go to Applications to launch RStudio.
Coder auto-signs in using the Unix user (whose username and password you defined in your custom image above).
RStudio may take a few additional seconds to start launch after the workspace is built.
All RStudio data is stored in the home directory associated with the user you sign in as, since this ensures that your data is saved if Coder shuts down or rebuilds your environment.
Logging
You can find your IDE logs in the following places:
- For code-server:
~/.local/share/code-server/logs/ - For JetBrains IDEs:
.cache/JetBrains/<JetBrains-IDE>/log/<IDE>.log