Configuring Okta
Okta is an identity provider that can be used for OpenID Connect (OIDC) Single Sign On (SSO) on Coder.
To configure custom claims in Okta to support syncing roles and groups with Coder, you must first have setup an Okta application with OIDC working with Coder. From here, we will add additional claims for Coder to use for syncing groups and roles.
You may use a hybrid of the following approaches.
(Easiest) Sync using Okta Groups
If the Coder roles & Coder groups can be inferred from
Okta groups,
Okta has a simple way to send over the groups as a claim in the id_token
payload.
In Okta, go to the application Sign On settings page.
Applications > Select Application > General > Sign On
In the OpenID Connect ID Token section, turn on Groups Claim Type and set
the Claim name to groups.
Optionally, configure a filter for which groups to be sent.
Important
If the user does not belong to any groups, the claim will not be sent. Make sure the user authenticating for testing is in at least one group.

Configure Coder to use these claims for group sync.
These claims are present in the id_token.
For more group sync configuration options, consult the IDP sync documentation.
# Add the 'groups' scope and include the 'offline_access' scope for refresh tokens
CODER_OIDC_SCOPES=openid,profile,email,offline_access,groups
# This name needs to match the "Claim name" in the configuration above.
CODER_OIDC_GROUP_FIELD=groups
Note
The offline_access scope is required in Coder v2.23.0+ to prevent hourly session timeouts.
These groups can also be used to configure role syncing based on group membership:
CODER_OIDC_SCOPES=openid,profile,email,offline_access,groups
# This name needs to match the "Claim name" in the configuration above.
CODER_OIDC_USER_ROLE_FIELD=groups
# Example configuration to map a group to some roles
CODER_OIDC_USER_ROLE_MAPPING='{"admin-group":["template-admin","user-admin"]}'
(Easy) Mapping Okta profile attributes
If roles or groups cannot be completely inferred from Okta group memberships, another option is to source them from a user's attributes. The user attribute list can be found in Directory > Profile Editor > User (default).
Coder can query an Okta profile for the application from the /userinfo OIDC endpoint.
To pass attributes to Coder, create the attribute in your application,
then add a mapping from the Okta profile to the application.
Directory > Profile Editor > {Your Application} > Add Attribute
Create the attribute for the roles, groups, or both. Make sure the attribute
is of type string array:

On the Okta User to {Your Application} tab, map a roles or groups
attribute you have configured to the application:

Configure using these new attributes in Coder:
# This must be set to false. Coder uses this endpoint to grab the attributes.
CODER_OIDC_IGNORE_USERINFO=false
# Include offline_access for refresh tokens
CODER_OIDC_SCOPES=openid,profile,email,offline_access
# Configure the group/role field using the attribute name in the application.
CODER_OIDC_USER_ROLE_FIELD=approles
# See our docs for mapping okta roles to coder roles.
CODER_OIDC_USER_ROLE_MAPPING='{"admin-group":["template-admin","user-admin"]}'

# If you added an attribute for groups, set that here.
# CODER_OIDC_GROUP_FIELD=...
Note
The offline_access scope is required in Coder v2.23.0+ to prevent hourly session timeouts.
(Advanced) Custom scopes to retrieve custom claims
Okta does not support setting custom scopes and claims in the default authorization server used by your application. If you require this functionality, you must create (or modify) an authorization server.
To see your custom authorization servers go to Security > API.
Note the default authorization server is not the authorization server your app is using.
You can configure this default authorization server, or create a new one specifically for your application.
Authorization servers also give more refined controls over things such as token/session lifetimes.
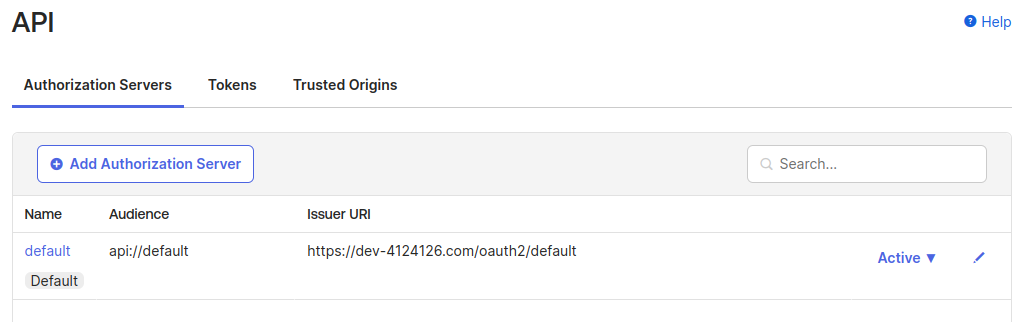
To get custom claims working, map them to a custom scope. Click the authorization server you wish to use (likely just using the default).
Go to Scopes, and Add Scope. Feel free to create one for roles, groups, or both:

Create the claim to go with the said scope. Go to Claims, then Add Claim. Make sure to select ID Token for the token type. The Value expression is up to you based on where you are sourcing the role information. Configure it to only be a claim with the requested scope. This is so if other applications exist, we do not send them information they do not care about:

Now we have a custom scope and claim configured under an authorization server. Configure Coder to use this:
# Grab this value from the Authorization Server > Settings > Issuer
# DO NOT USE the application issuer URL. Make sure to use the newly configured
# authorization server.
CODER_OIDC_ISSUER_URL=https://dev-12222860.okta.com/oauth2/default
# Add the new scope you just configured and offline_access for refresh tokens
CODER_OIDC_SCOPES=openid,profile,email,roles,offline_access
# Use the claim you just configured
CODER_OIDC_USER_ROLE_FIELD=roles
# See our docs for mapping okta roles to coder roles.
CODER_OIDC_USER_ROLE_MAPPING='{"admin-group":["template-admin","user-admin"]}'
Note
The offline_access scope is required in Coder v2.23.0+ to prevent hourly session timeouts.
You can use the "Token Preview" page to verify it has been correctly configured
and verify the roles is in the payload.

Troubleshooting
Users Are Logged Out Every Hour
Symptoms: Users experience session timeouts approximately every hour and must re-authenticate
Cause: Missing offline_access scope in CODER_OIDC_SCOPES
Solution:
- Add
offline_accessto yourCODER_OIDC_SCOPESconfiguration - Restart your Coder deployment
- All existing users must logout and login once to receive refresh tokens
Refresh Tokens Not Working After Configuration Change
Symptoms: Hourly timeouts, even after adding offline_access
Cause: Existing user sessions don't have refresh tokens stored
Solution: Users must logout and login again to get refresh tokens stored in the database
Verify Refresh Token Configuration
To confirm that refresh tokens are working correctly:
- Check that
offline_accessis included in yourCODER_OIDC_SCOPES - Verify users can stay logged in beyond Okta's access token lifetime (typically one hour)
- Monitor Coder logs for any OIDC refresh errors during token renewal