Coder powers secure, scalable development across key industries — automotive, finance, government, and technology — enabling faster builds, tighter compliance, and seamless AI adoption in enterprise-grade cloud environments.
By default, the Coder server runs
built-in provisioner daemons,
which execute terraform during workspace and template builds. However, there
are often benefits to running external provisioner daemons:
Secure build environments: Run build jobs in isolated containers,
preventing malicious templates from gaining sh access to the Coder host.
Isolate APIs: Deploy provisioners in isolated environments (on-prem, AWS,
Azure) instead of exposing APIs (Docker, Kubernetes, VMware) to the Coder
server. See
Provider Authentication
for more details.
Isolate secrets: Keep Coder unaware of cloud secrets, manage/rotate
secrets on provisioner servers.
Reduce server load: External provisioners reduce load and build queue
times from the Coder server. See
Scaling Coder for more
details.
Each provisioner runs a single
concurrent workspace build.
For example, running 30 provisioner containers will allow 30 users to start
workspaces at the same time.
Provisioners are started with the
coder provisioner start command in
the full Coder binary. Keep reading
to learn how to start provisioners via Docker, Kubernetes, Systemd, etc.
The provisioner daemon must authenticate with your Coder deployment.
We recommend creating finely-scoped keys for provisioners. Keys are scoped to an
organization, and optionally to a specific set of tags.
Use coder provisioner to create the key:
To create a key for an organization that will match untagged jobs:
coder provisioner keys create my-key \
  --org default

Successfully created provisioner key   my-key! Save this authentication token, it   will not be shown    again.

<key omitted>
To restrict the provisioner to jobs with specific tags:
coder provisioner keys create kubernetes-key \
  --org default \
  --tag environment=kubernetes

Successfully created provisioner key kubernetes-key! Save this    authentication token, it will not be    shown again.

<key omitted>
Keep reading to see instructions for running provisioners on
Kubernetes/Docker/etc.
Provisioner Tags
You can use provisioner tags to control which provisioners can pick up build
jobs from templates (and corresponding workspaces) with matching explicit tags.
Provisioners have two implicit tags: scope and owner. Coder sets these tags
automatically.
Organization-scoped provisioners always have the implicit tags
scope=organization owner=""
User-scoped provisioners always have the implicit tags
scope=user owner=<uuid>
For example:
# Start a provisioner with the explicit tags
# environment=on_prem and datacenter=chicago
coder provisioner start \
  --tag environment=on_prem \
  --tag datacenter=chicago

# In another terminal, create/push
# a template that requires the explicit
# tag environment=on_prem
coder templates push on-prem \
  --provisioner-tag environment=on_prem

# Or, match the provisioner's explicit tags exactly
coder templates push on-prem-chicago \
  --provisioner-tag environment=on_prem \
  --provisioner-tag datacenter=chicago
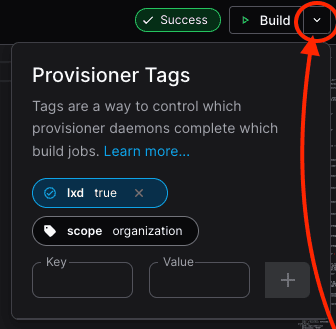
This can also be done in the UI when building a template:
Workspace tags defined with the coder_workspace_tags data source
template do not automatically apply to the template import job! You may
need to specify the desired tags when importing the template.
A provisioner can run a given build job if one of the below is true:
A job with no explicit tags can only be run on a provisioner with no explicit
tags. This way you can introduce tagging into your deployment without
disrupting existing provisioners and jobs.
If a job has any explicit tags, it can only run on a provisioner with those
explicit tags (the provisioner could have additional tags).
The external provisioner in the above example can run build jobs in the same
organization with tags:
environment=on_prem
datacenter=chicago
environment=on_prem datacenter=chicago
However, it will not pick up any build jobs that do not have either of the
environment or datacenter tags set. It will also not pick up any build jobs
from templates with the tag scope=user set, or build jobs from templates in
different organizations.
Note
If you only run tagged provisioners, you will need to specify a set of
tags that matches at least one provisioner for all template import jobs and
workspace build jobs.
You may wish to run at least one additional provisioner with no additional
tags so that provisioner jobs with no additional tags defined will be picked
up instead of potentially remaining in the Pending state indefinitely.
To generate this table, run the following command and
copy the output:
go test -v -count=1 ./coderd/provisionerdserver/ -test.run='^TestAcquirer_MatchTags/GenTable$'
Types of provisioners
Provisioners can broadly be categorized by scope: organization or user. The
scope of a provisioner can be specified with
-tag=scope=<scope> when
starting the provisioner daemon. Only users with at least the
Template Admin role or higher may create
organization-scoped provisioner daemons.
External provisioners started using a
pre-shared key (PSK) are always
organization-scoped.
Organization-Scoped Provisioners
Organization-scoped Provisioners can pick up build jobs created by any user.
These provisioners always have the implicit tags scope=organization owner="".
coder provisioner start --org <organization_name>
If you omit the --org argument, the provisioner will be assigned to the
default organization.
coder provisioner start
User-scoped Provisioners
User-scoped Provisioners can only pick up build jobs created from
user-tagged templates. Unlike the other provisioner types, any Coder user can
run user provisioners, but they have no impact unless there exists at least one
template with the scope=user provisioner tag.
coder provisioner start \
  --tag scope=user

# In another terminal, create/push
# a template that requires user provisioners
coder templates push on-prem \
  --provisioner-tag scope=user
Example: Running an external provisioner with Helm
Coder provides a Helm chart for running external provisioner daemons, which you
will use in concert with the Helm chart for deploying the Coder server.
Create a provisioner key:
coder provisioner keys create my-cool-key --org default
# Optionally, you can specify tags for the provisioner key:
# coder provisioner keys create my-cool-key --org default --tag location=auh --tag kind=k8s

Successfully created provisioner key kubernetes-key! Save this authentication
token, it will not be shown again.

<key omitted>
Create a provisioner-values.yaml file for the provisioner daemons Helm
chart. For example:
coder:
  env:
    - name: CODER_URL
      value: "https://coder.example.com"
  replicaCount: 10
provisionerDaemon:
  # NOTE: in older versions of the Helm chart (2.17.0 and below), it is required to set this to an empty string.
  pskSecretName: ""
  keySecretName: "coder-provisioner-keys"
  keySecretKey: "my-cool-key"
This example creates a deployment of 10 provisioner daemons (for 10
concurrent builds) authenticating using the above key. The daemons will
authenticate using the provisioner key created in the previous step and
acquire jobs matching the tags specified when the provisioner key was
created. The set of tags is inferred automatically from the provisioner key.
Refer to the
values.yaml
file for the coder-provisioner chart for information on what values can be
specified.
You can verify that your provisioner daemons have successfully connected to
Coderd by looking for a debug log message that says
provisioner: successfully connected to coderd from each Pod.
As mentioned above, the Coder server will run built-in provisioners by default.
This can be disabled with a server-wide
flag or environment variable.
coder server --provisioner-daemons=0
Prometheus metrics
Coder provisioner daemon exports metrics via the HTTP endpoint, which can be
enabled using either the environment variable CODER_PROMETHEUS_ENABLE or the
flag --prometheus-enable.
The Prometheus endpoint address is http://localhost:2112/ by default. You can
use either the environment variable CODER_PROMETHEUS_ADDRESS or the flag
--prometheus-address <network-interface>:<port> to select a different listen
address.
If you have provisioners daemons deployed as pods, it is advised to monitor them
separately.